16 Nisan 2012 Pazartesi
Colorful PSD Set
Read more ...
Silhouettes of Ocean Animals PSD
In this pack you will find various silhouettes of ocean animals such as: Dolphins, Sharks, Crabs and some other fish. This file contains both layered PSD file and vectors.
In this pack you will find various people silhouettes. You can open this psd files with Photoshop CS or newer. The psd people silhouettes are in vector format.
In this pack you will find psd trees in various positions. This psd trees are in vector format and can be opened with Photoshop CS or newer.
Turn a Portrait Photo Into a Painting
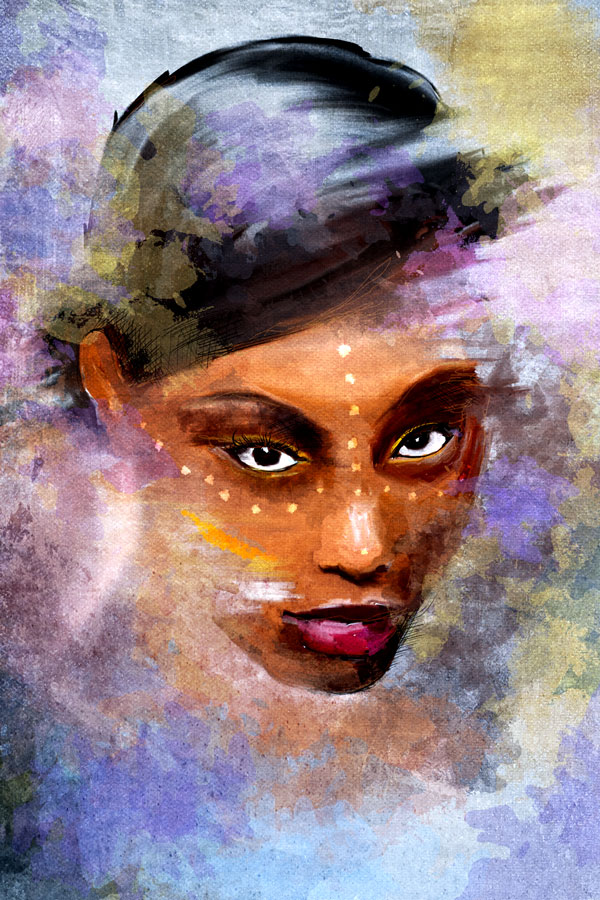
This tut. we are celebrating the launch of PhotoDune, Envato’s new stock photography website with a series of photo effect and photo manipulation tutorials that showcase the images from our new marketplace. In this tutorial we will turn a photo into a digital painting using several techniques to achieve a mixed media look. For this workflow you don’t necessarily need to be good at freehand drawing as we won’t start from scratch but use the photo as the base of our artwork.
Step 1
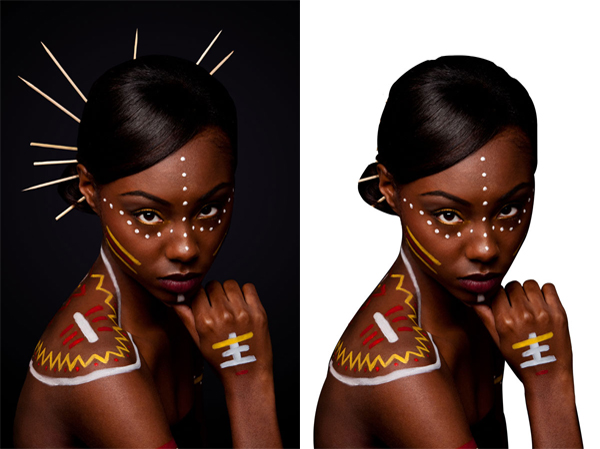
Open the Tribal beauty photo. First of all we need to extract the woman from the original background of the photograph. We don’t need to include the sticks in her hair, which makes the selection a bit easier. As the background and the foreground are too close to each other in colors we will you use the Pen tool for the selection. You can see the end result of the masking on this image:
Step 2
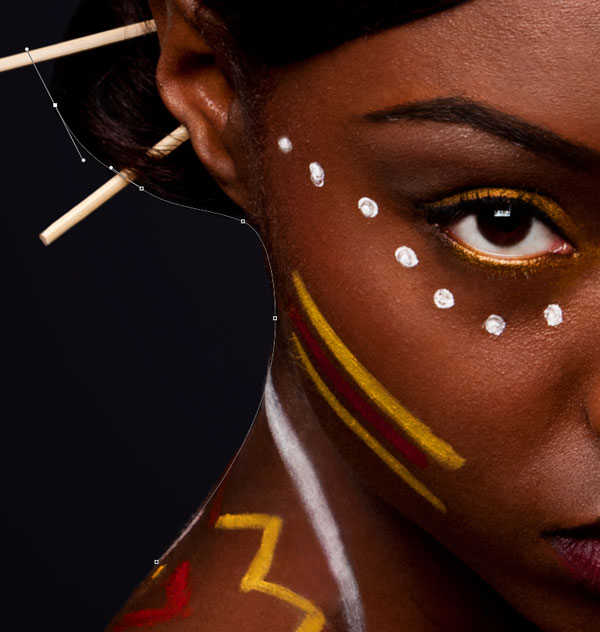
On images like this using the Pen tool is very useful as we have lots of clean curves on the edges. With the Pen tool you can create curves easily to track the outlines of the portrait. Once we draw the whole path, we will turn it into a selection and save it as a pixel mask. You should select the Pen tool and make sure you use the Path mode.

Step 3
You can choose to include the hand and the body in the selection and use it in the final composition but if you want to make the masking faster you can leave it out and only focus on the head as we will only use the head in this tutorial. Try to use the least amount of anchor points for your path but try to follow the edges preciously with your curves. If you are not familiar with the Pen tool check this tutorial out from my Photoshop for Beginners series:
Step 4
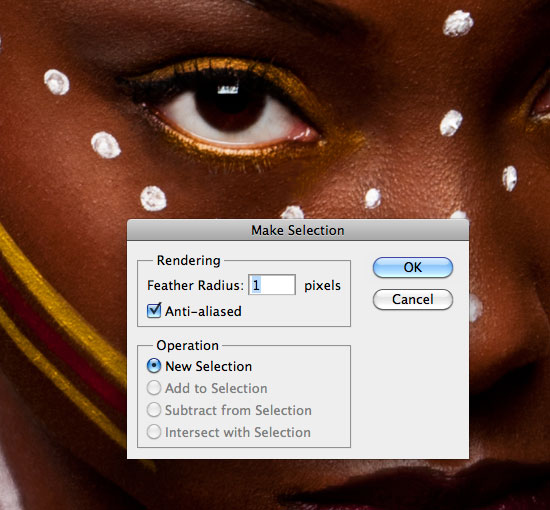
Once you go around the head with the Pen tool and you finish the path by closing it up you are ready to turn it into a selection. While still having the Pen tool selected use right click and choose Make Selection from the context menu. You can add 1 pixel feather.
Step 5
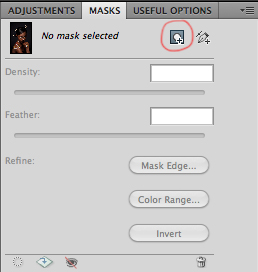
After you made your selection you will need to turn the Background layer into a normal layer by double clicking on it in the Layers panel and call the layer Portrait. After this turn your selection into a Pixel Mask by clicking on the this icon in the Mask panel or at the bottom of the Layers panel:
Step 6
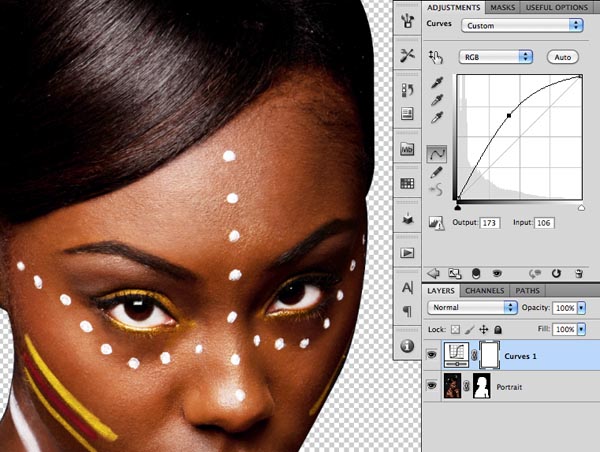
The mask will hide the original background, where you should see transparent pixels now. Next thing we need to do is to brighten up the portrait. We are going to use a Curves Adjustment layer with the following curve:
Step 7
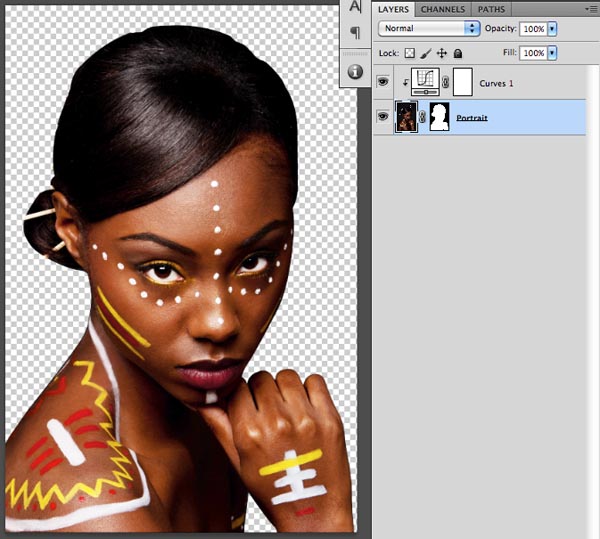
Select the Adjustment layer and make a clipping mask between the adjustment and the portrait layers by pressing Ctrl + Alt + G / Cmd + Option + G to make sure the adjustment won’t affect other layers below. After this use the Free Transform tool from the Edit menu (Ctrl/Cmd + T) to make the whole portrait slightly bigger to fill the original frame more tightly.
Step 8
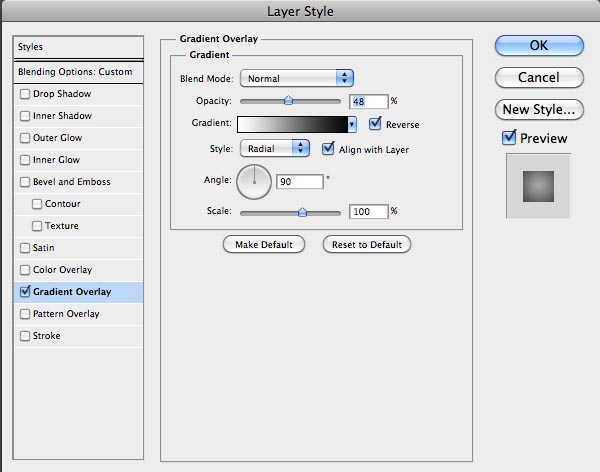
We need to create a new layer at the bottom of the layer structure. Fill in this new and empty layer with white (press D and then Ctrl/Cmd + Backspace) and then apply the following layer style on it:
Step 9
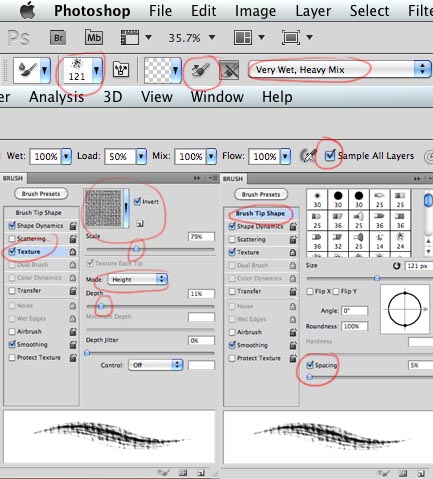
You can call this layer Background. Next step is to make a new layer on top of the other layers and call it Mixer Brush. On this layer we are going to start creating the foundation of the painting effect. You will need to download the Watercolor Splatter brush set for this step. You can find the link at the beginning of the tutorial. Once you have the brush file, just double click on it to install it. After that the brush set should be available in Photoshop. First of all you will have to select the Mixer Brush tool (CS5 only) and set up the following options for it:
- Choose Splatter 24px (from the Watercolor Splatter brush set)
- Set the brush size to 121 px
- Turn off the ‘Load brush after each stroke’ option
- Choose Very Wet, heavy Mix option
- Turn Sample All Layers option on
- In the Brushes panel you will have to turn on Texture, Load the Artistic Surfaces and choose Dark Coarse Weave texture (turn Invert option on)
- Under Texture set Mode to Height, Scale to 79% and Depth to 11%
- If you have a tablet use Shape Dynamics too and set the Size Control to Pen Pressure (if you work with a mouse you don’t need this)
- Under Brush Tip Shape set the Spacing to 5%
Step 10
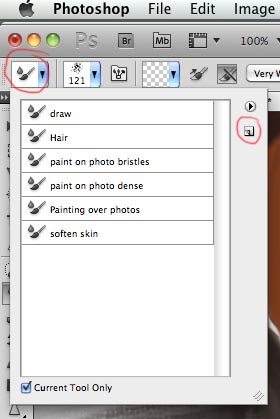
After all these settings it is worth saving this brush setup for later use. Let’s save it as a Mixer Brush Tool preset. Click on the far left icon on the control bar and click on the new icon and name the brush Painting over photos.
Step 11
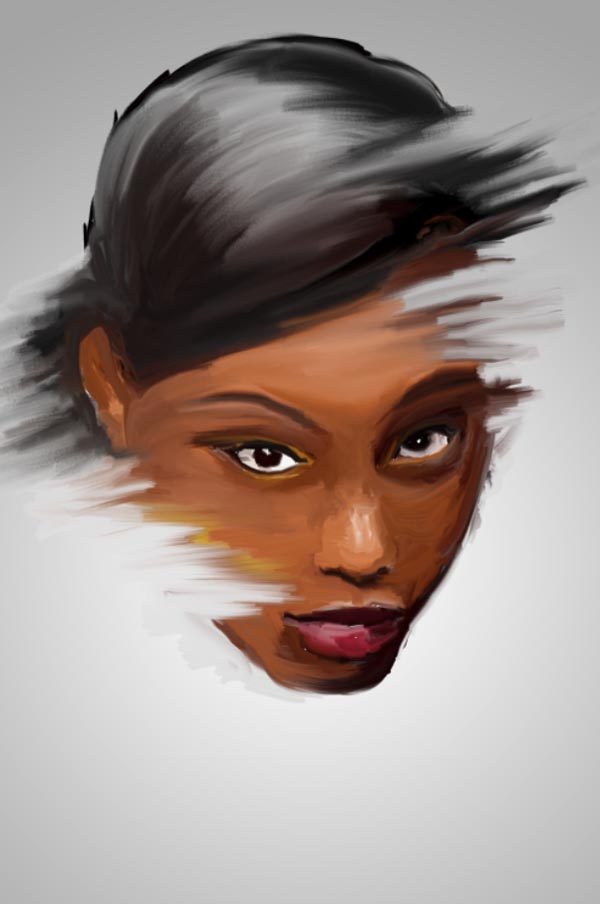
Make sure you have the new empty layer selected before you start painting over the photo. With this setup on the Mixer Brush you will be able to paint over the portrait blend details together. The Mixer Brush will not only use the portrait layer but it will also sample from the background, which will help us to break up the original edges of the face to make it a bit more artistic, painterly. Try to keep the details on the eyes, nose and mouth but you can be much more loose on the other parts of the face. Use your creativity in this step.
Step 13
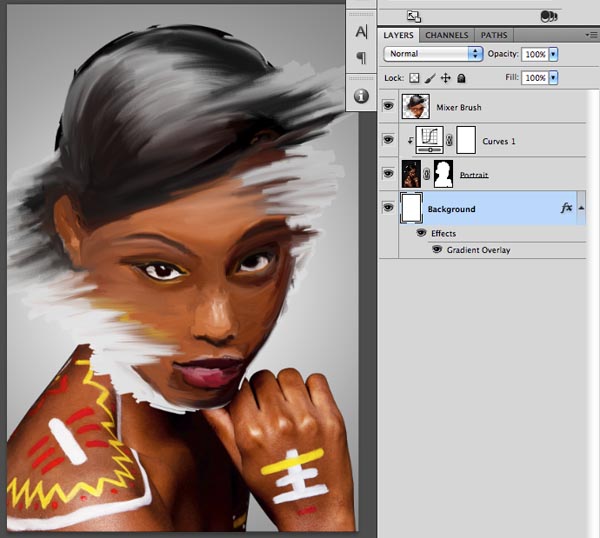
After this point you can turn off the Portrait layer, which will also turn off the clipped Curves Adjustment layer. We don’t need them anymore, but it is good to keep them in case we want to add some more detail to the Mixer Brush layer (like the hand for instance).
Step 14
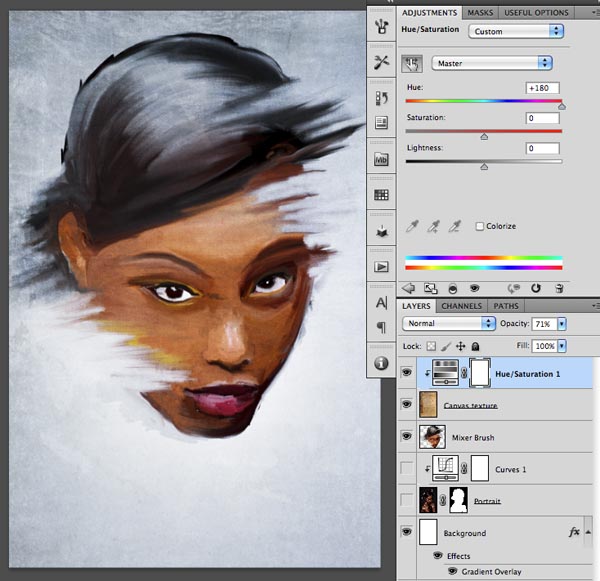
It is time now to add more canvas feel to our painting with the image you can download from the link I included at the start. Open up this image and drag it on top of our composition and name the layer Canvas Texture. Set the blend mode to Overlay and then create a Hue/Saturation adjustment layer with the following options (this adjustment layer has to be clipped to the texture layer):
Step 15
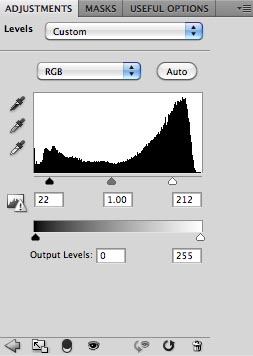
To increase the contrast lets add a Levels Adjustment Layer on the top with these values:
Step 16
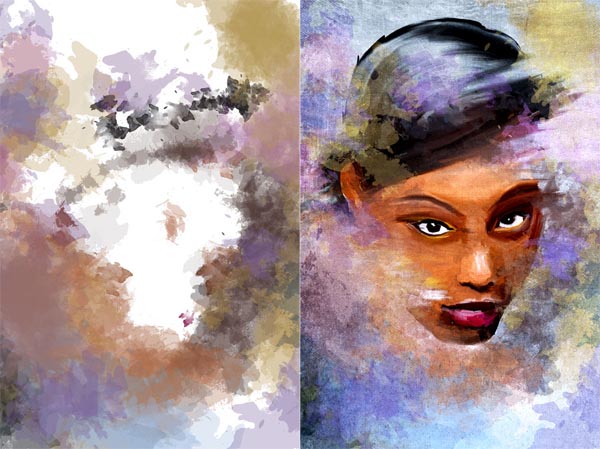
It is time now to make the whole painting more dynamic and interesting by using the Splatter brushes with Brush tool. Create a new layer under the Canvas Texture and call it Colors. There is no correct way to set the options for this step as you will get interesting effects no matter what options you use. It is useful to work with more than one brush tip shape from the brush set and also to use Jitter on the size and angle to get more variation. I was changing my color a lot and I tried to introduce interesting and vivid tints like purple, yellow and blue. On the left you can see the Colors layer separated and on the right the way it looks together with the other layers. This step took roughly 20 minutes, but it is the fun part of the process.
Step 17
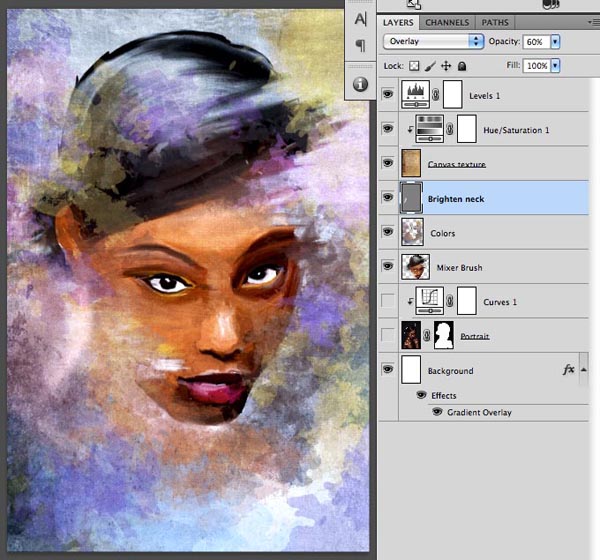
Now we need to show the neck somehow. An interesting way to do it is to brighten the background instead of outlining the curve of the neck. This technique is very similar of using a sponge or a cloth to smudge and brighten up parts of your painting. The way we can easily do it in Photoshop is to make a new layer above the Colors and below the Canvas Texture, then fill this layer with 50% gray (Edit/Fill option with 50% gray option), set the blend mode to Overlay and the opacity to 60%. Once you are ready with this you will need to use the Brush tool with a soft edge brush set to white color and 20% opacity on this layer. Simply brush over the neck and maybe other areas as well a couple of times where you feel a bit of brightening would help the overall look. Optionally you can also darken with this layer if you change your brush color to black.
Step 18
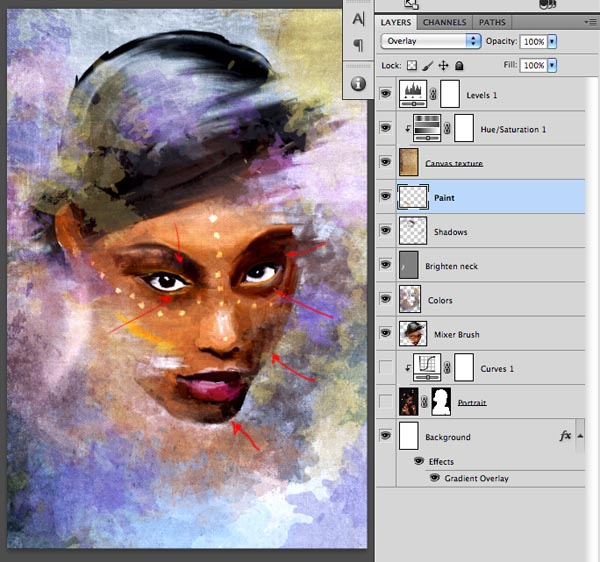
Next step is to add more detail onto the face. I wanted to emphasise the eyes so I decided to create two new layers. I used a layer to paint some dark details (marked with red arrows) and another layer set to Overlay blend mode for adding bright paint spots on the face. These spots are actually following the design of the original makeup from the photograph.
Step 19
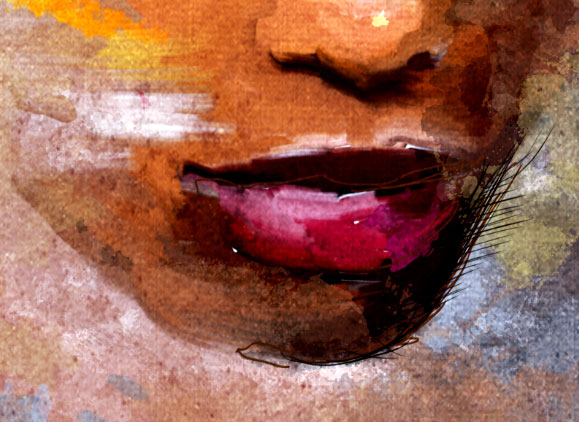
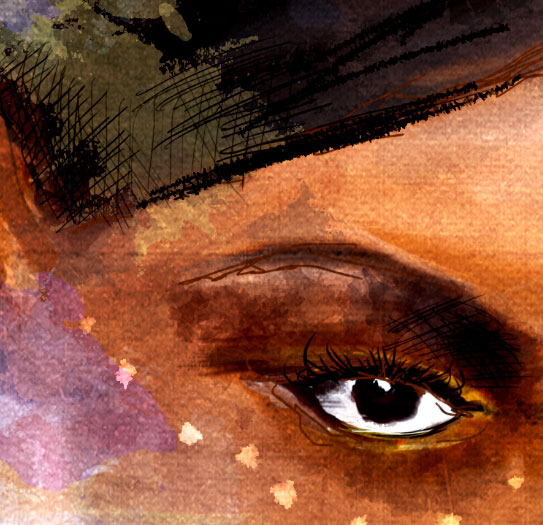
The last layer we need to create is for adding more detail to the whole portrait. On this layer I will use a simple default circular brush with hard edges and draw over parts of the image. You can place this layer below the Canvas texture and you call it Ink as it is similar to using ink over paint. Here are two close ups to see the details of this new layer:
Step 20
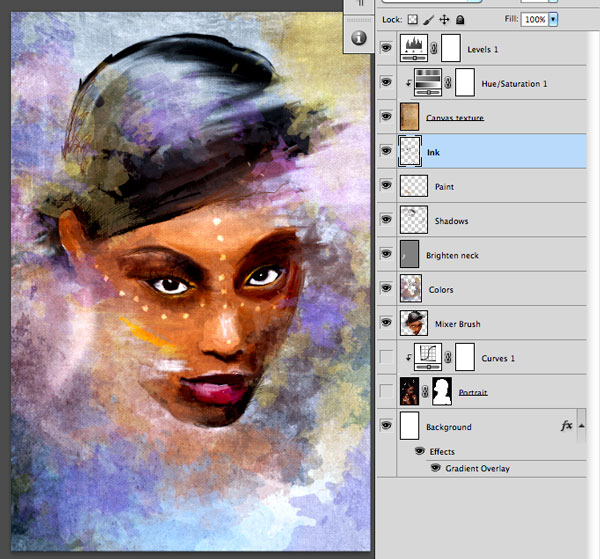
After this point it is up to your imagination how to finish the whole piece. Hopefully it was inspiring to go through these steps together. On the image below you can see the final layer structure:
Final Image

15 Nisan 2012 Pazar
Realistic Portrait Retouching With Photoshop Amazing Tutorial
Today’s designers and photographers need to have a varied skill set that sets them apart from the pack. One common skill that both can use is portrait photography retouching. This tutorial will make you a more effective retoucher and help keep your portraits looking clean and realistic. Subtlety is – going too far will only make the results noticeable. The best comment you can get after presenting a final image is "I didn’t even notice you did that". Let’s get started!
Final Product
What You'll See in Final






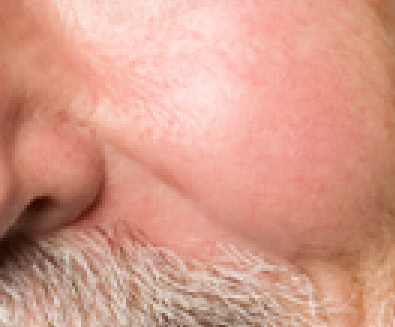
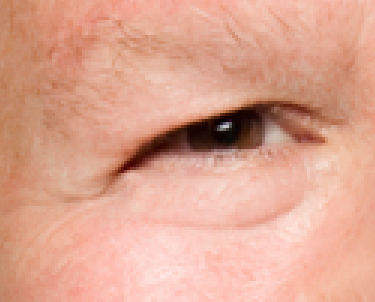
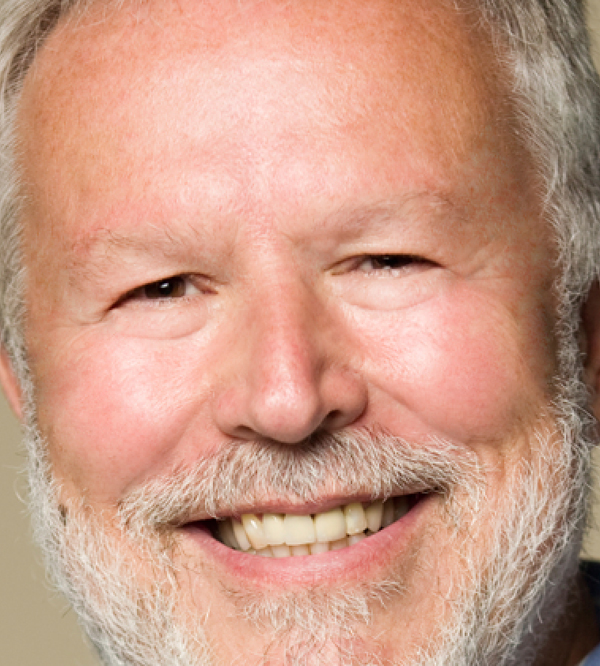

Final Product
What You'll See in Final
Step 1
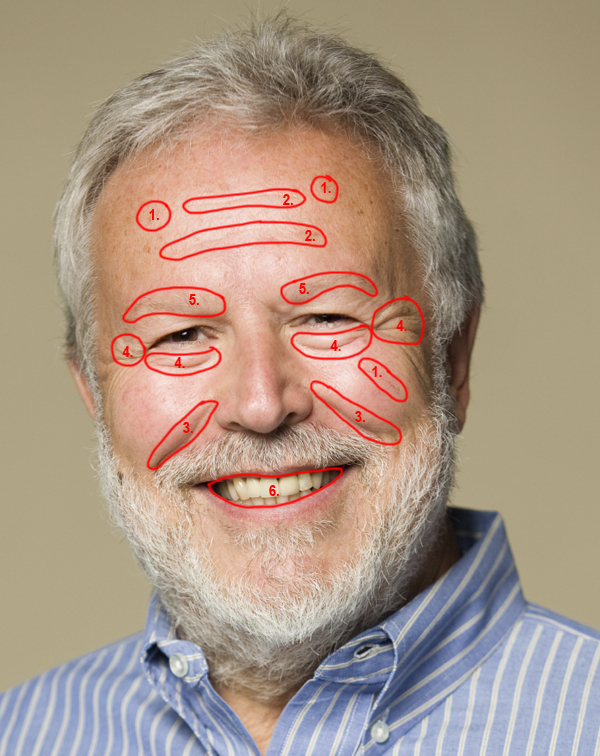
Step 1 does not involve using a tool at all. Before you start retouching an image, you should open and evaluate the image and come up with a mental roadmap of what need be done. I’ve illustrated the steps necessary to retouch this portrait below.
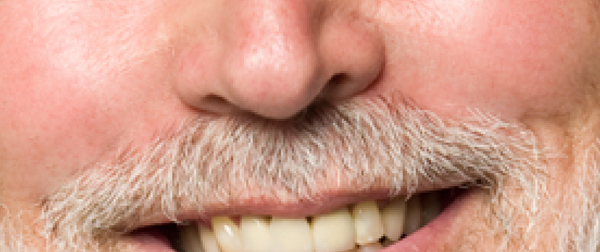
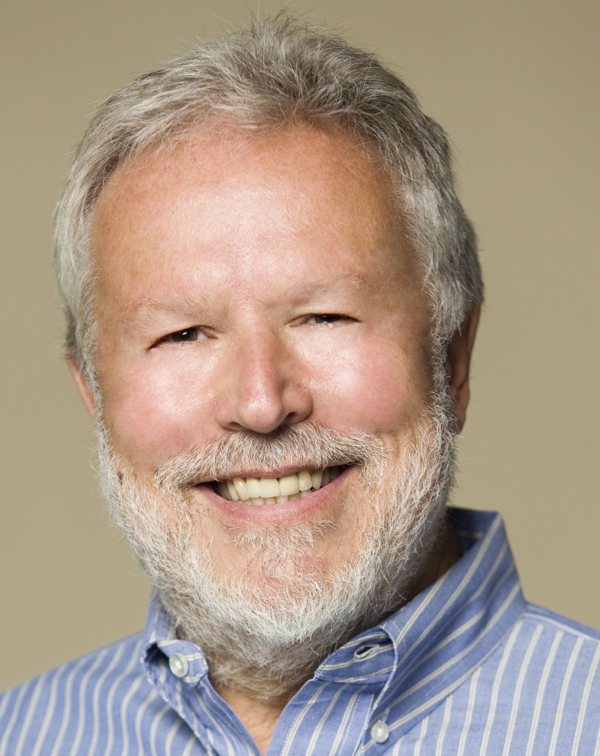
The areas to retouch are: 1. Age spots, skin blemishes and other skin issues; 2. Forehead wrinkles; 3. Laugh lines and deep wrinkles; 4. Bags under eyes and crows feet; 5. Thinning eyebrows; 6. Stained teeth

Step 2
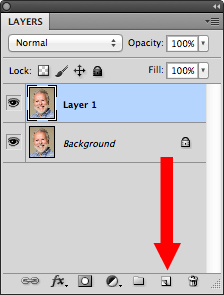
First, we need to work non-destructively. Duplicate the layer in the Layers Panel, by either dragging the background layer to the New Layer icon at the bottom of the Layer Panel, or by using the keyboard shortcut Command/Ctrl + J to duplicate the Layer Via Copy. This will give us "Layer 1". Double click the layer name and rename "Retouched". This will be the layer we will do all our retouching on, leaving the Background untouched.

Step 3
The first tool we will be using is the Spot Healing Tool shown in the Tool Bar below or with the tool shortcut "J".

The Spot Tool utilizes local texture and tone to blend over flawed areas in your image. There are several settings in the Options Bar at the top of your window. There are only two that we are going to need to focus on however. The first is the Brush Picker (1) and the Type (2).
First, Access the Brush Picker via the drop down arrow on the right side of the button. The only control we need to adjust in this window is the Hardness, which we will set it to 50%. 50% will blend the tool with the existing image better than 100%, which looks like a paper punch, but will not soften the brush too much. 0% will blend too much and diminish the effectiveness of the tool. Hit enter/return to exit the window – do not click off to the side to close the panel or you may accidentally affect your image. Next, make sure you are on "Proximity Match" for this portion of the tutorial. Photoshop CS5 has an added feature – "Content-Aware", but we are not going to use that (yet).
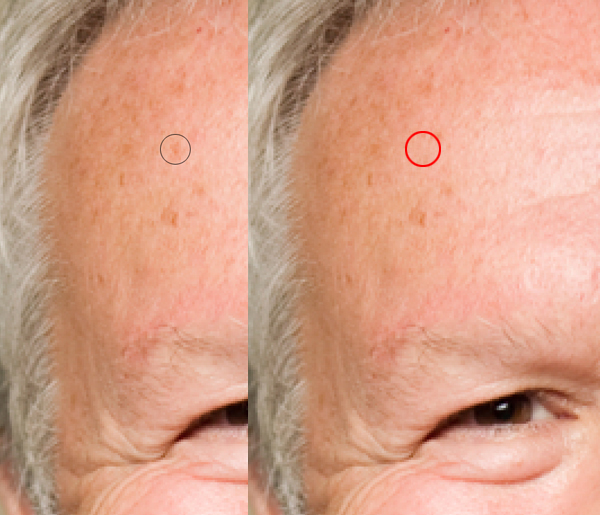
We are now ready to start retouching the image. The Spot Tool is a brush-based tool and only needs to be slightly larger that the small flaws we are repairing. To adjust the brush size, use your bracket keys to change the size. Left bracket [ makes the brush smaller and right bracket ] makes it larger. (You can also adjust the hardness by adding the Shift key, but we want to keep this at 50%). Center your brush over your flaw, click and release. It should cover the flaw and blend in flawlessly. If it does not, make sure that your brush is properly sized and that you are not overlapping another texture, like hair or darker skin tones, etc.
Repeat this step until all skin small blemishes are removed. If you have larger areas (the vein on the cheek) leave those for now, and concentrate on smaller spots, freckles, moles, etc. Remember to adjust the brush using the bracket keys as you go. Keep it small – if you increase your brush size tool large, the tool will fail by mixing too much information and you will end up with a mess. No worries, there are tools designed for larger areas.

Step 4
After repairing the small spots, it’s time to move up to the larger flaws – forehead wrinkles, larger skin defects and laugh lines. To repair these areas, we will be using the Healing Brush Tool, which can be found under the Spot Healing Tool. Click and hold on the tool in the toolbar to access the additional healing tools. The Healing Brush tool repairs similar to the Spot Tool, but it splits the workload in two. Texture is now designated by the user (you) and tone is blended locally after you use the tool.
Once you select the tool, again access the Brush Picker in the Options Bar and make sure the Hardness is set to 50%. Make sure the "Align" option is checked to the right of the Options Bar. You can use the bracket key shortcut to change the size as needed.

We will start with the forehead wrinkles. Move your brush to a clean area of skin texture – usually you can find this between the wrinkles. We want to make sure that we have enough room to move and not run into other textures, like his hair or other wrinkles.
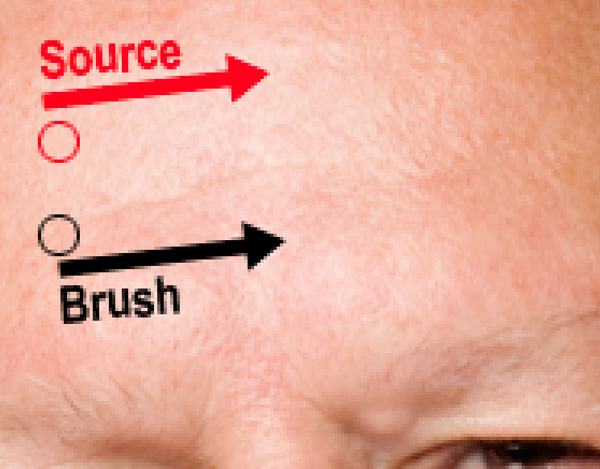
Hold down your Opt (Mac)/Alt (PC) key and click once to designate the texture source. Then take your tool and align the brush over the beginning of the wrinkle. Change your brush size to a size slightly wider the wrinkle. Click and hold, then brush across the flaw. Notice that your source icon is following your every move, offset based on your source. Try to paint in one mouse-click if possible, but if you notice that your source is getting close to another texture, you can release. When you release, the tool blends the tone locally making the new texture blend in with the existing surroundings. The "Align" feature will keep your source offset exactly where you designated it, until you choose another source. With each flaw, you should Opt/Alt-Click another source area and then paint over the flaw.

For the laugh lines, align the source slightly above the flaw and offset enough that you can paint over the entire wrinkle in one motion. Cover the initial wrinkle first, then blend the tone with additional strokes. Always be aware of your surroundings. If you get too large of a brush, you could accidentally blend in the lighter color of the mustache or other areas. Adjust your size as needed.

Step 5
The eyes present the biggest challenge on any portrait. Flaws are usually are so close to the eye and other areas (eyelashes, eyebrows, etc.) that using the Healing Brush is almost impossible given the size constraints. This is where the Patch Tool comes in. The third healing tool of the group, the Patch Tool is not brush based at all- it is selection based. Choose the Patch Tool under the Healing Brush Tool in the Tool Bar.
The only setting we have to check on this tool is that it is set to "Source" in the Options Bar.
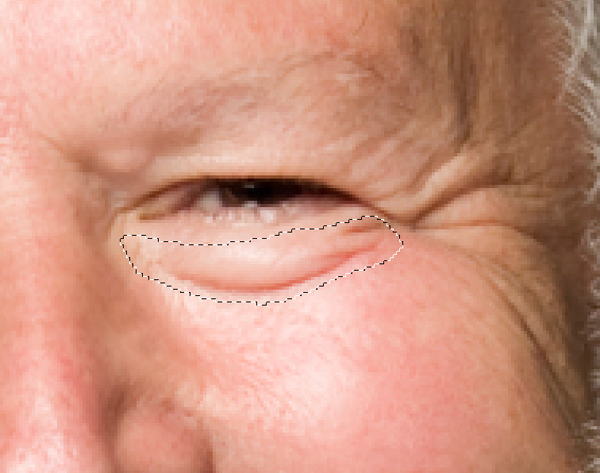
Start by using the Patch tool to make a selection around the bag under the right eye. I like to dissect the eye wrinkles into sections. This gives me a more effective result than trying to select around the entire eye at one time.

Next click and drag the selection to a clean area of skin texture, like the forehead, and release. The new texture blends with the local tone and the wrinkle is gone. Repeat around the eye, selecting sections (left, right, top, bottom) individually and dragging the selection to a clean texture source.

Step 6
After you have the eyes completed, this is what the finished "Retouched" layer should look like:

But as you can see, this looks completely unrealistic. The trick is to use a Layer Mask to blend the original image back into the retouched layer.
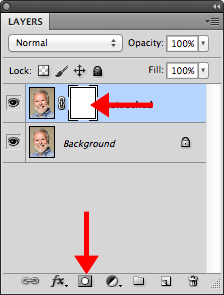
Start by clicking the Layer Mask button at the bottom of the Layers Panel. This will give you a Layer Mask on the Retouched Layer.

Then, using the Eraser tool we will blend back in some of the flaws from the original image. Set your background color to Black (or hit "D" for default colors) and change your Eraser opacity to 33%. Make sure you are using a soft-edged brush (at least 50% Hardness).
Start by erasing over the laugh lines in one stroke. Choose a brush size that will encompass the flawed area. This will slowly bring back the flaw. I like to go over the entire wrinkle once, then on the second pass starting at the nose, I go halfway down the wrinkle giving it 66% coverage. Lastly I go right next to the nose on another pass making it 99%. This technique fades the wrinkle away as it moves further away from the nose. Repeat on the other side.

For the eyes, I use the same technique, but start at the corner of the eye closest to the nose and blend away from the nose. Remember to build slowly back into the area, we do not want to bring the entire flaw back at 100%. For the crows feet, I only went with one pass since they were so defined.

This is how the blended face looks after masking:

Step 7
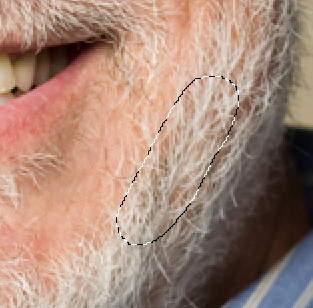
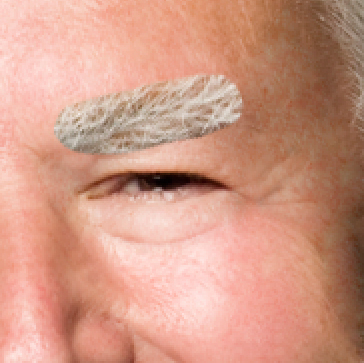
After blending the face, I noticed that his eyebrows were pretty thin and I wanted to add some more definition back into that area. We can do this using a new process in Photoshop CS5 – Puppet Warp. First, make a selection around his beard using the lasso tool like so:

Next click on the Retouched layer icon in the Layers panel (deselecting the mask) and duplicate the selection onto a new layer using Command/Ctrl + J. Name the layer "Eyebrow". Move the image up to the eyebrow area and rotate to the approximate angle using Edit > Transform.

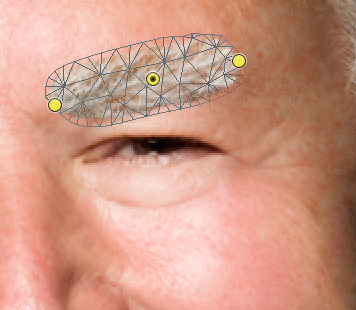
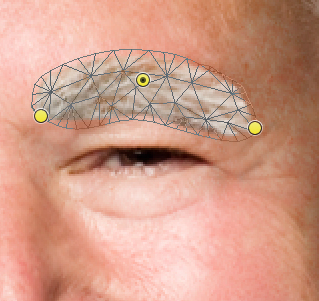
Next, go to Edit > Puppet Warp. This will create a mesh over your eyebrow. Click on the two ends of the eyebrow, dropping pins on the mesh. Click and drop a third pin in the middle of the eyebrow.

Click and drag the pins to warp the eyebrow to match the contour of the existing shape. And hit Enter/Return to accept the warp.

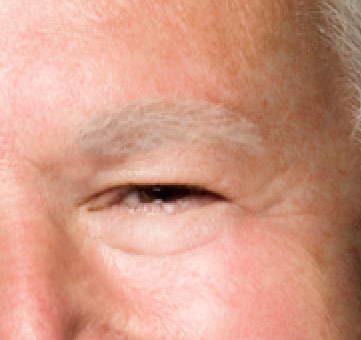
Finally, drop the opacity on the Eyebrow layer and using a soft eraser, blend the edges of the new eyebrow to the portrait. Repeat the steps for the other eyebrow.

Step 8
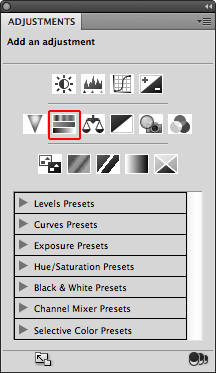
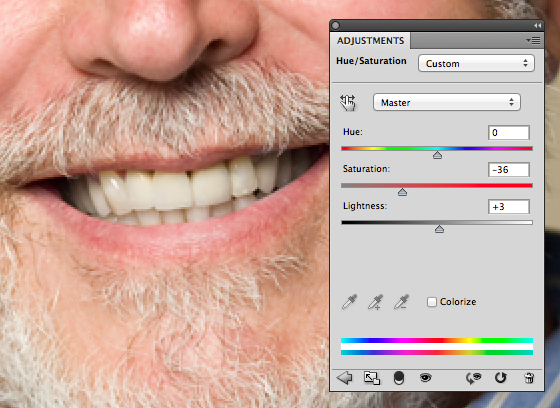
To whiten the teeth, simply make a rough selection using the lasso tool. Next, go to the Adjustments Panel and create a new Hue/Saturation Adjustment Layer.

Adjust the Saturation setting to the negative side, desaturating the yellow teeth. Do not go too far, you still want some color. Adjust brightness if needed. Do not adjust the Hue.

Final Image
Here is the final image. Wrinkles are nice and blended, new eyebrows for our friend and a whiter smile.

Source by PsdTuts
Kaydol:
Kayıtlar (Atom)


